Click "Profile" on the top right corner of your Facebook, to make sure you are starting off at the right place. If you are not sure what your profile is, I'm amazed that you are smart enough to find this blog and know how to read it. Kudos!! Kind of. If you reach Buttbook, you've gone too far. Back up. There. Facebook. Good. Profile. Okay. Moving on.
Step #2
Once you have reached your Facebook profile, find the picture of you on the left hand side. It will probably look a little different than my picture, because you are most likely not wearing my pink swimsuit and coverup in your profile picture. And if you are, I hope you at least had the decency to wash out the crotch and dry it after wearing it. Look under that picture until you see the word Friends. If you do not have the word Friends there, then you most likely do not have any friends and there is no need to continue with this process so please stop reading now and go eat a taco.
Step #3
Step #4
Click Edit Friends in top right corner. Again, if you have no friends, I'm not sure if this will be an option. Please, resume eating your taco.
Step #5
Click Create A List in top right corner. If you do not wish to create a list, please defer to the taco eating.
Step #6
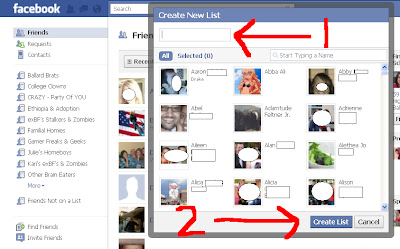
Now this is where it gets tricky. If you feel like you are becoming overwhelmed, this is a good time to take a few deep breaths and perhaps make something to drink. Preferably something with ice. Lots and lots of ice. But not the hard ice that hurts your teeth; the soft chompy ice like they have at hospital snack rooms or at Sonic. After you have consumed at least half of your beverage, follow the arrow #1. There should be a box where you can type. This is the magical box where you can write the name of your first group, so make it good people!! After you have typed in the name of your first group of friends (ie: Coworkers That Steal My Lunch, People That I Have Slashed Their Tires, Crazy Ex-Boyfriends, People I Am Currently Stalking, etc), follow the arrow #2. Click Create A List.
Repeat this step until you have all of your groups named.
Step #7
Just so you know, my husband is eating a mini bag of crunchy chips right now and I have massive sound aversions and I'm fairly sure the makers of said chips spent millions of dollars making their product have the most annoying crunchy bag sound in the world. Mission accomplished, dudes. Mission accomplished.
Assuming you have no horrible distractions like I do, click Add Multiple in the top right corner. This will allow you to add as many zombies as you want at a time.
Step #8
Save List, y'all!!!
Step #9
Fairly sure my ADD is kicking in right now. Do you know what would be really sweet? If unicorns could talk. I'm pretty sure most unicorns have rainbow hair, but I'm not totally positive. I bet that means they like skittles! Yummy.
Step #10
If you want to make sure that everyone is in a group (where they belong, because nobody likes being left out! Unless you are an antisocial shut-in, then you might want to be left out...) go to the "All Friends" tab and again choose "All Friends" (not Recently Interacted, Recently Added, blah blah blah...). This will make sure that you have a list of ALL of your friends, not just the freaks that you have talked to lately.
Step #11
Move your mouse to the right hand side of the friends name, but to the left of the little X. It should say "Edit Lists" when your mouse is on it. DO NOT CLICK. Just move the mouse. Yes, I know it's hard to not press buttons, but please refrain. If necessary, keep a giant red button next to your computer to press in case of emergency, if you are too tempted. A little black box should appear, listing which group or groups you put that friend into. If no box appears, you can click on "Edit Lists" (YIPPEE for getting to press buttons!!) and click on a list to add them to.
Step #12
Profits.


No comments:
Post a Comment